 Save
Save I remember trying a fancy candy bar once, something with chewy caramel and crunchy nuts, and thinking, "This is good, but I bet I could make it even better at home." That spark of an idea grew into an obsession, especially during those colder months when the kitchen feels like the warmest, most inviting place. The thought of transforming simple chocolate and gooey caramel into a layered masterpiece was irresistible. This recipe became my go-to for a truly indulgent treat, a little slice of heaven that always feels just right.
I remember bringing these to Sarah's annual holiday cookie exchange one year, nestled among dozens of elaborate sugar cookies and spiced shortbreads. I was a little nervous they'd be overlooked, but the moment someone bit into one, their eyes just widened. Soon, people were hovering around the plate, trying to figure out how I'd made such perfect layers. It was such a fun, unexpected hit, proving that sometimes the simplest concepts, executed well, can steal the show.
Ingredients
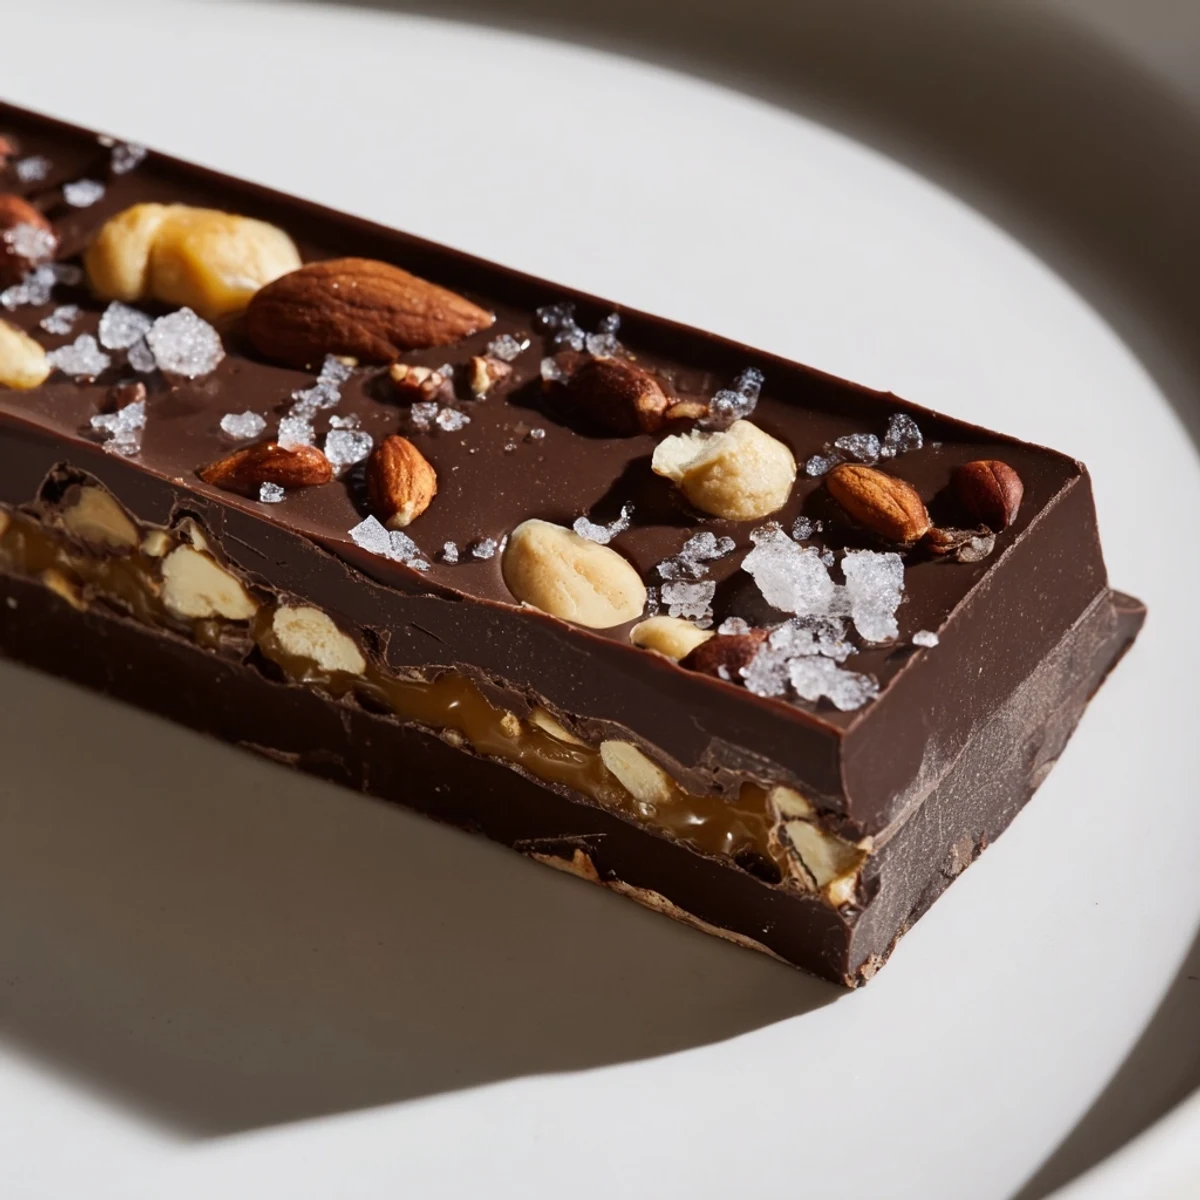
- Dark or semi-sweet chocolate: This is your canvas; good quality chocolate makes all the difference for that luxurious snap and deep flavor.
- Unsalted butter: A touch of butter gives your chocolate a beautiful sheen and helps it cut cleanly without crumbling.
- Soft caramels: The unwrapped kind save you a headache, and they melt down into the most divine, chewy layer.
- Heavy cream: This is the secret to a smooth, pourable caramel that won't seize up and spreads like a dream.
- Mixed nuts: A medley adds complex texture and depth; toasting them beforehand truly unlocks their full, earthy flavor.
- Flaky sea salt: That little sprinkle on top is a game-changer, cutting through the sweetness with a delightful savory pop.
Instructions
- Prep Your Pan:
- Get that 20 x 20 cm (8 x 8 inch) baking pan lined with parchment paper, leaving plenty of overhang on the sides – future you will thank you for this easy lift-out trick.
- Melt the First Chocolate Layer:
- Gently melt the chocolate and butter together, stirring until it's a glossy, smooth river. Pour half of this decadent mixture into your prepared pan and pop it into the fridge for 15 minutes to set.
- Craft Your Caramel:
- Meanwhile, in a small saucepan, coax the unwrapped caramels and heavy cream into a velvety, golden pool over low heat. Stir patiently and continuously until the mixture is completely smooth and luscious.
- Layer it Up:
- Spread that warm, rich caramel evenly over your chilled chocolate layer. Shower it generously with your chopped mixed nuts, pressing them in ever so gently, and finish with a whisper of flaky sea salt if you're using it.
- Seal with Chocolate:
- Carefully pour the remaining melted chocolate over the nut layer, ensuring every delicious bit is tucked in and completely covered. Give the pan a gentle tap on the counter to settle the chocolate and release any air bubbles.
- Chill & Slice:
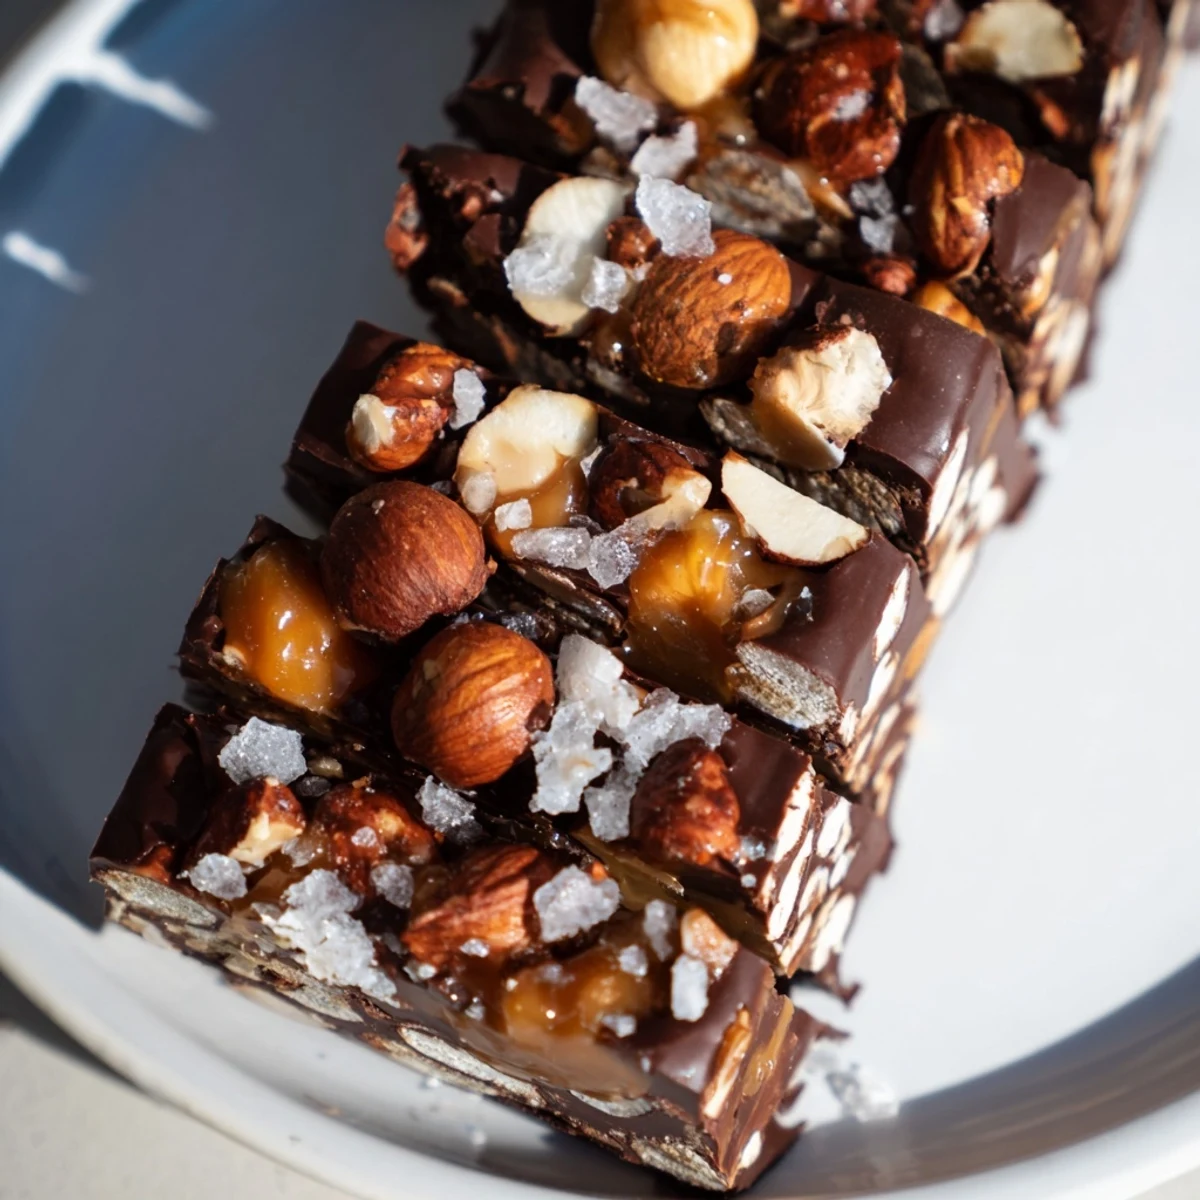
- Return the pan to the refrigerator for at least 30 minutes, or until everything is fully set and firm. Use those handy parchment overhangs to lift the entire slab out, then slice into beautiful bars with a sharp, warm knife. Serve at room temperature for the best texture!
 Save
Save There's something incredibly satisfying about pulling these bars from the fridge, the layers perfectly distinct, the aroma of chocolate and caramel filling the air. One evening, after a particularly hectic week, I savored a square with a steaming cup of strong coffee, and it felt like a tiny, indulgent victory. It wasn't just a treat; it was a moment of quiet enjoyment, a reward for effort, both in life and in the kitchen, proving that sometimes simple pleasures are the most profound.
The Perfect Pour
When pouring your chocolate layers, ensure the melted chocolate isn't too hot; if it's steaming, let it cool for a minute or two, otherwise, it might slightly melt the layer beneath, blurring your beautiful lines. A slightly cooled, but still very fluid, chocolate ensures an even spread and prevents unsightly swirls or premature mixing of layers. This also applies to the caramel; it should be warm enough to spread easily, but not scorching.
Achieving Clean Cuts
Cutting these bars cleanly is absolutely key to their presentation, and I've learned a trick that makes all the difference. After the final chill, let the entire slab sit at room temperature for about 5-10 minutes – this takes the extreme chill off and prevents the chocolate from cracking when you apply pressure. For super clean lines, heat your sharp knife under hot water, wipe it completely dry, and make one swift cut, reheating and wiping the knife between each slice.
Customization & Storage Secrets
Don't be afraid to experiment with your nut choices; pistachios add a lovely green hue and unique flavor, while toasted pecans bring a buttery richness. If you find your caramels are too firm to melt smoothly even with the cream, add an extra tablespoon of cream to help them along without diluting the flavor too much. For the best texture and freshness, store these beauties in an airtight container in the refrigerator, but let them come to room temperature for about 10-15 minutes before serving for optimal chewiness and flavor.
- Consider swapping the chocolate type for a milk chocolate bar for an extra sweet treat.
- You can make these ahead for parties; they hold up beautifully in the fridge.
- A good quality chocolate really shines through, so splurge a little if you can.
 Save
Save These chocolate caramel nut bars are more than just a dessert; they're a labor of love that always pays off with smiles and satisfied sighs. Enjoy every decadent, homemade bite, and watch them disappear!
Recipe FAQs
- → How can I achieve clean, crisp cuts for these bars?
- <p>For the cleanest cuts, ensure the layered treat is thoroughly chilled and firm before slicing. Use a sharp, warm knife (run it under hot water and dry it between cuts) and wipe the blade after each slice to prevent sticking and maintain neat edges.</p>
- → What type of nuts work best, or can I substitute them?
- <p>Mixed nuts like almonds, hazelnuts, and pecans offer a great variety of texture and flavor. However, you can absolutely substitute with your favorite nuts or even seeds if preferred. Toasted nuts will add an extra layer of depth.</p>
- → How should I store these bars to keep them fresh?
- <p>Store the finished bars in an airtight container in the refrigerator. They will maintain their best quality for up to one week. Bring them to room temperature for a few minutes before serving for optimal texture.</p>
- → My caramel layer seems too soft or too hard. What can I do?
- <p>If your caramel is too soft, it might need a bit more time to chill. If it's too hard, the mixture might have been cooked too long or with too little cream. You can gently reheat the caramel with a touch more cream, or ensure you use soft caramels as specified to begin with.</p>
- → Can I use a different type of chocolate for the layers?
- <p>Certainly! While dark or semi-sweet chocolate is recommended for a balanced sweetness, you can substitute with milk chocolate for a sweeter bar, or even white chocolate for a different flavor profile. Just be mindful of how different chocolates set.</p>
- → Is toasting the nuts before adding them really necessary?
- <p>Toasting the nuts is optional but highly recommended. It deepens their flavor and enhances their crunch, contributing significantly to the overall taste and texture of the bars. A quick toast in a dry pan or oven can make a big difference.</p>